stripe

Creating a Campaign and Connecting your Stripe Account To Campaign

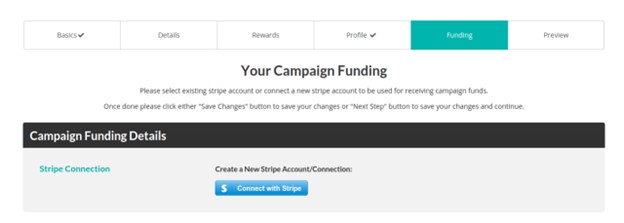
As a project creator you are now ready to create a campaign and connect your stripe account to your CrowdFunding campaign. Here are a few short steps showing how to do this.

STEP 1. Once you have created your campaign, head to the ‘Funding’ tab and click ‘Connect with Stripe’.

STEP 2. This will redirect you to Stripe, you will need to login if you haven’t done so or fill out the form. You can skip the form if you are in ‘Development Mode’ (you must be logged in to your stripe account as well).

STEP 3. Now you can select your stripe account in the drop down, based on the account email. Live and Test connections will be labelled.

STEP 4. Fill out the rest of the information for your campaign and after all fields are filled out, you can now send it for review.

Tagged

Introducing Direct Transactions

“Direct Transactions” is a feature which allows for direct stripe connect transactions that portal admin can toggle.

Basically, this mode allows all the funds from campaigns to go to a single stripe account which is selected by the admin. Admin can then distribute the funds to campaign creators or managers manually.

By enabling this feature, campaign creators no longer need to go through the individual stripe setup (funding step) which greatly reduces the complexity for anyone who tries to setup a new campaign.

Following is a brief tutorial for helping site owners to locate and use the setting:

1. Go to ‘administration dashboard’ and then go to ‘Portal Settings’.

2. Under ‘Stripe Settings’, there is ‘Direct Transactions’. If that is toggled on, then all transactions will go to the main Stripe account configured on portal settings.

3. Save the settings and it’s good to go.

Tagged

How to Setup and Configure Stripe account for your Crowdfunding portal

In this tutorial, we will cover how to set up your stripe account and connect it to your crowdfunding site.

Step 1: Create a Stripe account

Stripe Signup Page

Step 2: After logging in, access your API Keys

Go to the Stripe Dashboard and click on the Developers option at the top right corner of the page.

Stripe API Keys

You will see a set of keys. To switch between TEST  and LIVE keys, toggle the “Viewing test data” on the side. TEST keys are used for testing (Test Secret Key and Test Publishable Key) and the other for the actual live transactions (Live Secret Key and Live Publishable Key).

Note: If you want to use live data you have to make sure that you have activated your account. You will need to also fill out a form to connect your bank account.

Step 3: Copy and paste your API keys to your crowdfunding platform. It is located under Administrator Dashboard > Portal Settings > Payment Settings tab > Secret/Publishable key fields.

Step 4: Go back to your Stripe dashboard, add a redirect URI and copy/paste your Client ID to your platform.

Click on Connect Settings

Click on the gear icon in the top right corner of the screen. In the Stripe admin dashboard, then scroll down and click on the connect settings. Make sure you turn the OAuth for Standard accounts setting ON.

Copy the Redirect URL that is shown in the payment settings page:

Redirect URL Stripe Dashboard

Also, don’t forget to copy your Client ID and paste it back to your crowdfunding platform’s payment settings as shown on the screenshot below.

Once these steps are done you are all set and ready to go!

Tagged