Bringing reading materials and financial literacy to the people of West Pokot, Kenya
This morning as I sit in bed with a cup of coffee waiting for the sun to rise, I feel incredibly grateful. Soon I’ll hear the beautiful noise that is my two young daughters awakening from their sleep, ready to take on the day with an enormous amount of energy.
I realized something this morning. I had started to take for granted many of the basic resources at my disposal that make the pursuit of a quality education accessible to myself and my family. It’s not that I’m ungrateful for these resources, but rather I had let the chaos of my day to day life distract me from being consciously mindful of these blessings.
As my daughters continue to sleep, I begin to plan out the day ahead. After breakfast, we’ll start by going to a Mommy & Me storytime event that our local public library hosts weekly. After that I’ll take my daughters to one of the many parks within our community so that my oldest can play with other kids her age and let out some much needed energy before naptime. In the afternoon, I’ll help guide her through some worksheets from a preschool activity book that I purchased at my local bookstore as a way to compliment her current school’s curriculum, followed by reading with them both from several of the numerous educational books that we have in our home library.
In contrast, nearly half way around the world and roughly 270 miles northwest of Nairobi, Kenya, lies the rural village of West Pokot. This is a place relatively untouched by technology, as evidenced through its severely lacking healthcare systems and illiteracy level of 90%. West Pokot is also a place where power relations between men and women are greatly unequal, and education for the well-being of women is not valued.

I’d like to introduce you to Josie, our fellow advocate, friend, and inspiration for the Manyatta Library renovation. She was born and raised in Kenya, in a tribe where, instead of aspiring to achieve an education, girls are born with the aspiration of being married off at a young age in order to provide the most financial support for their family. In fact, it’s quite common for girls as young as 10 years old to be married off if their family cannot afford to pay for their education costs.
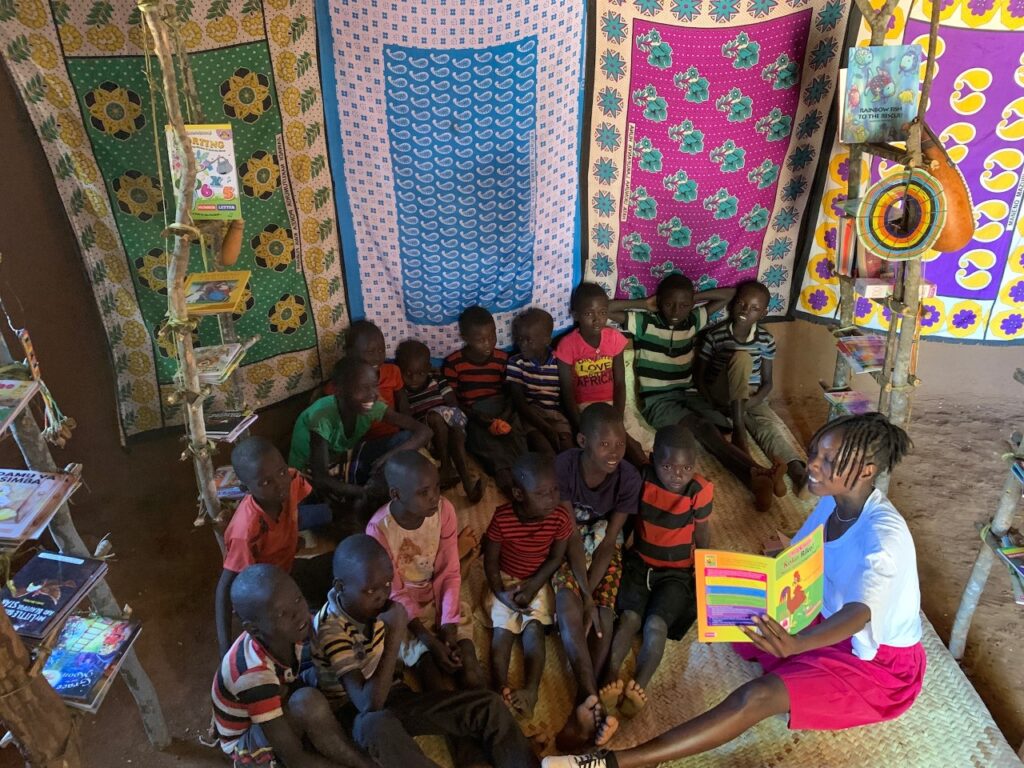
Insecurity and lack of access to information regarding schools in this community are some of the many factors that restrict these children from accessing education, thus leaving them in a vicious cycle of poverty and illiteracy. Josie was fortunate enough to come from a family who was able to afford to provide her with a quality education in the United States. Because of this, she was able to eventually earn her masters degree in public health, and is Director of Programs and Development at Color My Dreams. A small non profit that was founded by Edith Cherotich. Through the nonprofit, Josie and her team work to promote literacy in the form of libraries, to ensure that every disadvantaged child has access to books and other educational materials that they need to reach their full potential.
By partnering with Color My Dreams Africa, Lite Tuition was able to renovate the main library within the Lokna village in Pokot—the Manyatta Library. The renovation was led by a group of 15 local West Pokot women who will also be responsible for maintaining the library with guidance from the CMDA team.
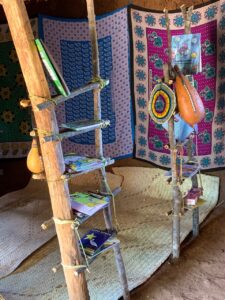
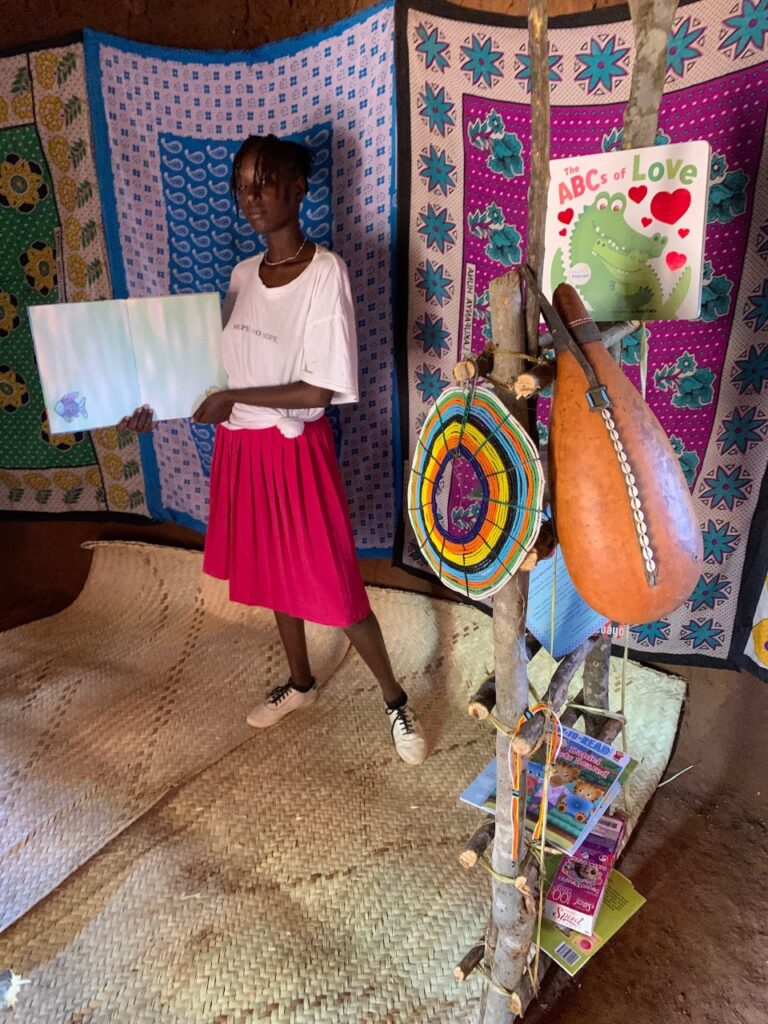
Unlike traditional libraries, books from the Manyatta Library are dropped off and picked up from villages within West Pokot so that students and teachers are not required to abandon their lifestyle or daily tasks in order to access the materials they need. To accomplish this, Little Tree libraries will be installed in 10 schools within 4 different villages in Pokot. The Little Tree libraries will be used to house books and other relevant materials within the schools themselves. Stewards have been appointed to each Little Tree library, and are responsible for its general maintenance and operations, including picking up and dropping off books from the Manyatta.
Lite Tuition’s mission is to help make education more accessible to anyone who seeks it, and we are thrilled to be able to partner with Color My Dreams Africa to work to make this mission a reality for the people of West Pokot!
Visit our website to learn more about how you can create your free educational savings campaign, or support some very hardworking students on their path to a debt-free education!

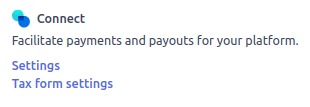
In this tutorial, we will cover how to set up your stripe account and connect it to your crowdfunding site.
Step 1: Create a Stripe account
Step 2: After logging in, access your API Keys
Go to the Stripe Dashboard and click on the Developers option at the top right corner of the page.
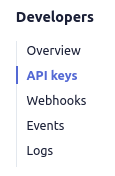
You will see a set of keys. To switch between TEST and LIVE keys, toggle the “Viewing test data” on the side. TEST keys are used for testing (Test Secret Key and Test Publishable Key) and the other for the actual live transactions (Live Secret Key and Live Publishable Key).
Note: If you want to use live data you have to make sure that you have activated your account. You will need to also fill out a form to connect your bank account.
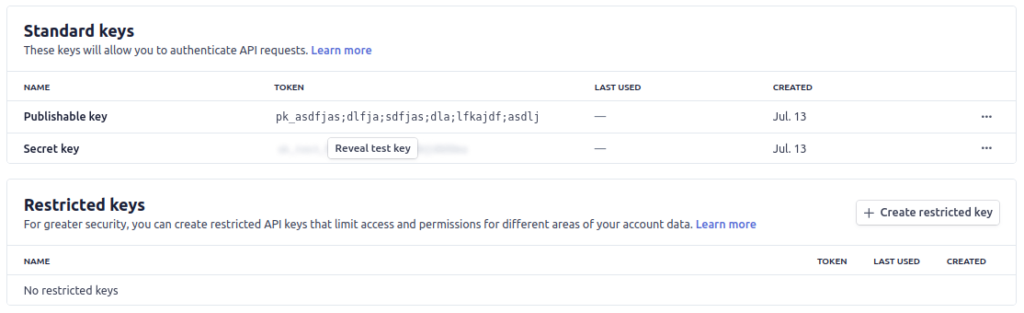
Step 3: Copy and paste your API keys to your crowdfunding platform. It is located under Administrator Dashboard > Portal Settings > Payment Settings tab > Secret/Publishable key fields.
Step 4: Go back to your Stripe dashboard, add a redirect URI and copy/paste your Client ID to your platform.
Click on the gear icon in the top right corner of the screen. In the Stripe admin dashboard, then scroll down and click on the connect settings. Make sure you turn the OAuth for Standard accounts setting ON.
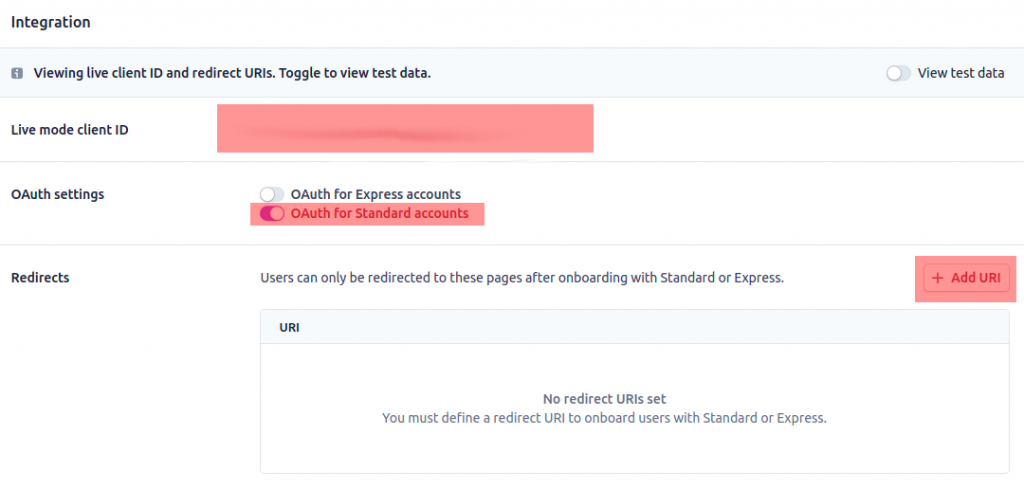
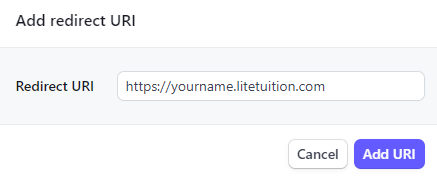
Copy the Redirect URL that is shown in the payment settings page:

Also, don’t forget to copy your Client ID and paste it back to your crowdfunding platform’s payment settings as shown on the screenshot below.

Once these steps are done you are all set and ready to go!
Do you want to use PayPal to accept payments on your CrowdFunding platform? If so, this tutorial will show you how to set up and configure PayPal payment gateway for your CrowdFunding instance.
PLEASE NOTE that currently you are not able to use marketplace mode when configuring the platform to be using PayPal as the payment gateway. This means that all of the donations on the platform are going into one single PayPal account. If you would like to use marketplace mode, please read this blog article.
Let’s get right into the steps!
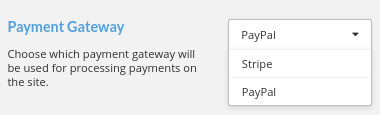
Step 1. Go to the payment settings and choose PayPal in the dropdown
Log into your platform as a portal admin and go to the admin dashboard –> Portal Settings –> Payment Settings –> in the Payment Gateway section, choose PayPal in the dropdown.
Step 2. Create the PayPal account
In this configuration, you will need to use a Business PayPal account to connect your account to the platform.
For this tutorial, we will be using a sandbox account in order to test the transactions without using any real money. You can also create a sandbox account if you would like to test the payments first before using a live account. You can create a sandbox account using the following URL: https://developer.paypal.com/
Step 3. Retrieve and paste the Client ID and Secret Key
Once you have created an account, you can log in and go to the accounts page. You will want to view the details for the account. Hover over the 3 dots and click on View/edit account.
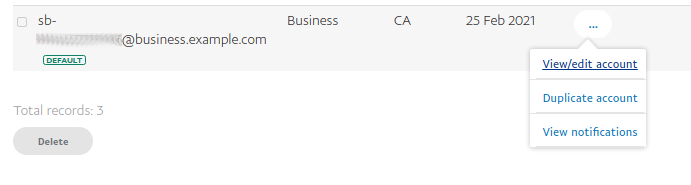
Go to the API Credentials tab for the account, then click on the Default Application link.
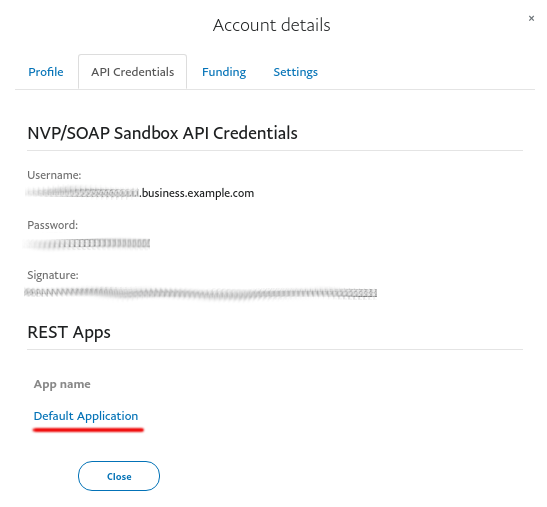
Here, you can see the Client ID and Secret Key to add in the Payment Settings in the Atlas admin dashboard.

You can paste these values into the correct fields.
Step 4. Save the settings and test the payments
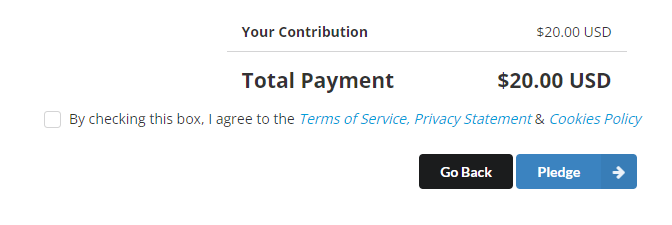
You can now save the Payment Settings in the admin dashboard and create a new campaign to test the transactions on the platform. When contributing, the user interface should look something like this.
If you are using a test account, you can only pledge using one of the sandbox accounts that you have. So you can go back to the accounts interface that you navigated to earlier in step 3, and click the View/edit account link for the account that you want to pledge with. If you would like, you can also create a new account to pledge with on that same page. When you click on the View/edit account button, you will see there is a Funding tab. In this funding tab, you can see the credit card information to add when making a test pledge.
Once you have made a successful pledge, be sure to check that the pledge has been captured into the correct account.
You will need to log into the account that is connected to the platform via the following link if you are testing: https://www.sandbox.paypal.com/
You should see that the pledge has been captured successfully.
PLEASE NOTE that you cannot use post charge with PayPal, so you will be capturing all donations instantly, without delays, into your PayPal account as soon as the donor makes a pledge.
That’s it, you can now accept donations via PayPal!
Portal Admin – Administration Dashboard Tutorial
This blog post will teach you about some the functionality and provide an overview of how to use the Administrator Dashboard.
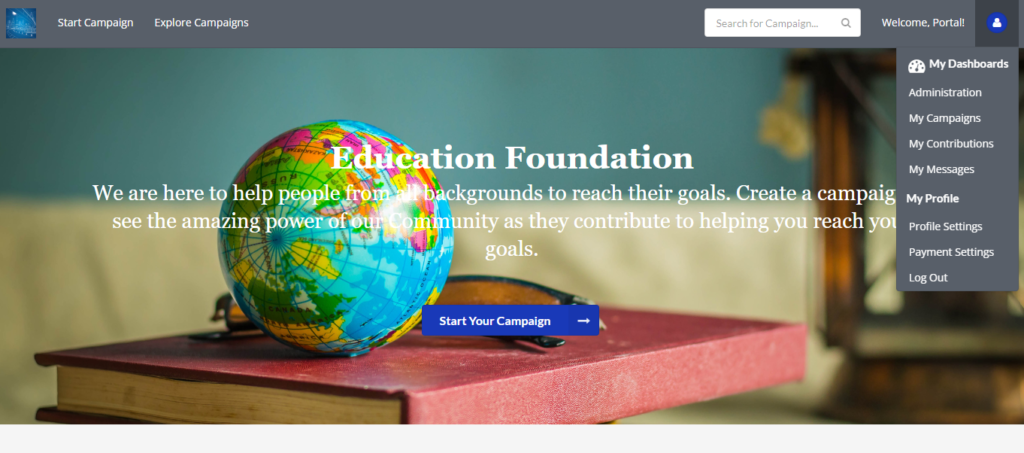
- Once you have logged in as Portal Admin you can click on the icon in the top right corner. This will open up the My Dashboard menu, click on Administration.

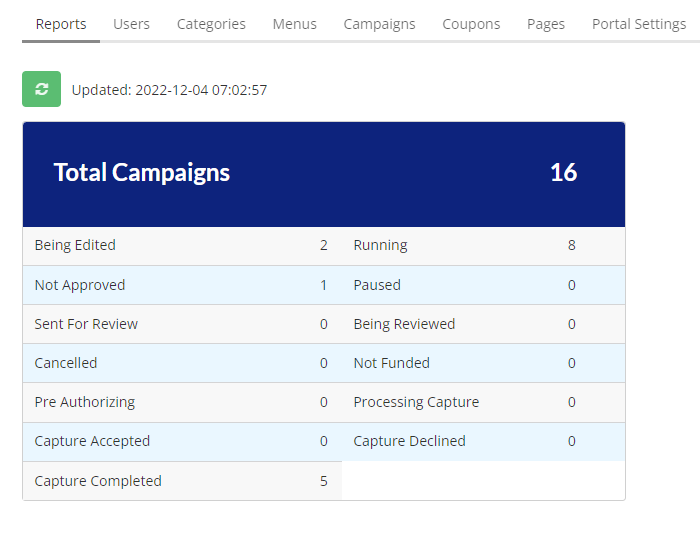
- Once you have entered the Administrator Dashboard you will see several tabs near the top of the page, the first being Reports.
Users
In the Users tab you can view all of the users that have accounts on your site.

- You can filter through users by clicking on and selecting an option from either of the two drop down menus or search by name or email on the far right.
- To add a user click on the Actions button and then select Add User from the drop down menu. An Add User form will pop up, fill it out with the new user’s information.
- To delete or approve a user you can click on the user’s check box on the left and then click on the Actions button. Select Delete Users or Approve Users from the drop down menu.
- Click on the Edit button on the far right to update a particular user’s information.
- Click on the Export to CSV button at the bottom of the page to download a spreadsheet list of all users.
Categories
In the Categories tab you can view all of the categories on your site.
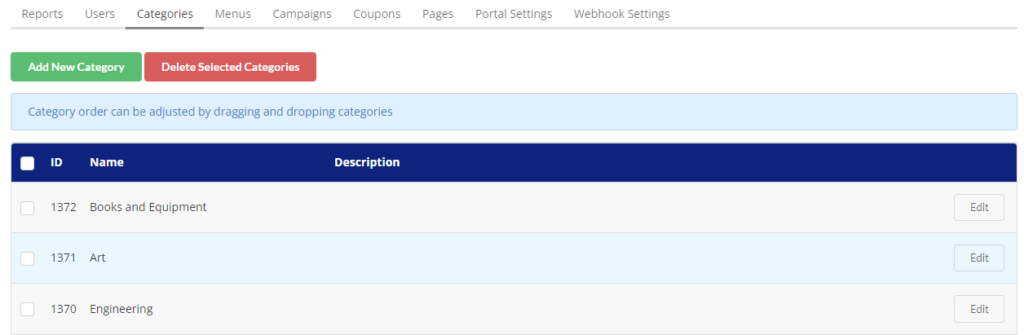
- To add a category click on the Add New Category button and fill out the form that pops up.
- To delete a category click in the check box beside the categories that you would like to delete, and then click the Delete Selected Categories button.
- Click on the Edit button on the far right to update the name and description of any particular category.
- You can change the order in which categories appear by clicking and holding down on a particular category row, drag and drop it into the appropriate place in the list.
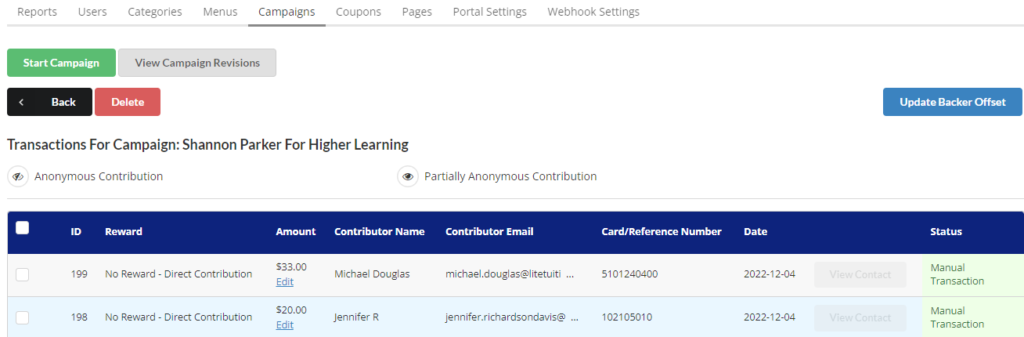
Campaigns
In the Campaigns tab you can view all of the campaigns that are on your site.

- You can filter through campaigns by clicking on and selecting an option from any of the three drop down menus or search by the campaign name on the far right.
- The Actions button has a few options for updating any particular campaign, (Approve Campaign, Delete Campaign, Feature Campaign, etc.). Click on the campaign’s check box on the left and then click on the Actions button. Select one of the options from the drop down menu.
- You can change the order in which campaigns appear by clicking and holding down on a particular campaign row, drag and drop it into the appropriate place in the list.
- In the table under the Action column you can select Edit from the drop down. This will bring you to the Campaign Basics page. From here you can view and update the selected campaign’s Details, Rewards, Profile, Funding and Preview. This blog post explains how to create or edit a campaign: Create a Campaign Tutorial.
- Click on the Transactions button on the far right to view a breakdown of funding transactions for a particular campaign. Click on the Export to CSV button at the bottom of the page to download a spreadsheet list of all transactions.
Pages
In the Pages tab you can view a list of the website pages that are on your site.
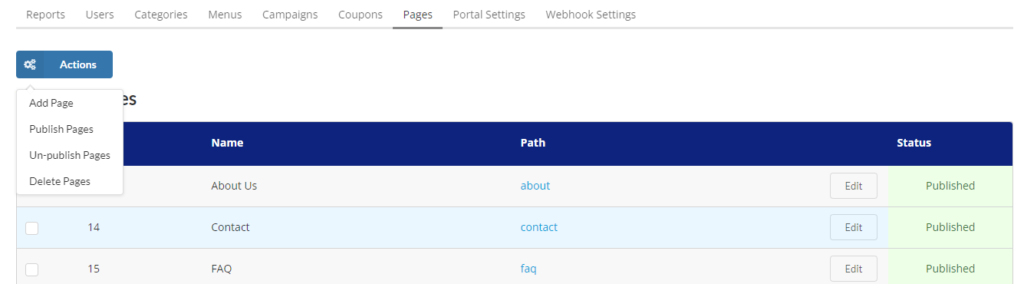
- To add a page you can click on the Actions button and then select Add Page from the drop down menu. An Add Page form will pop up. Fill out the input fields and add content below. Click the Save Page button once you are done editing.
- To publish, un-publish or delete pages click on the user’s check box on the left and then click on the Actions button. Select Publish Pages, Un-publish Pages or Delete Pages from the drop down menu.
- Click on a link in the Path column to view the page. Click Edit on the right to update a page.
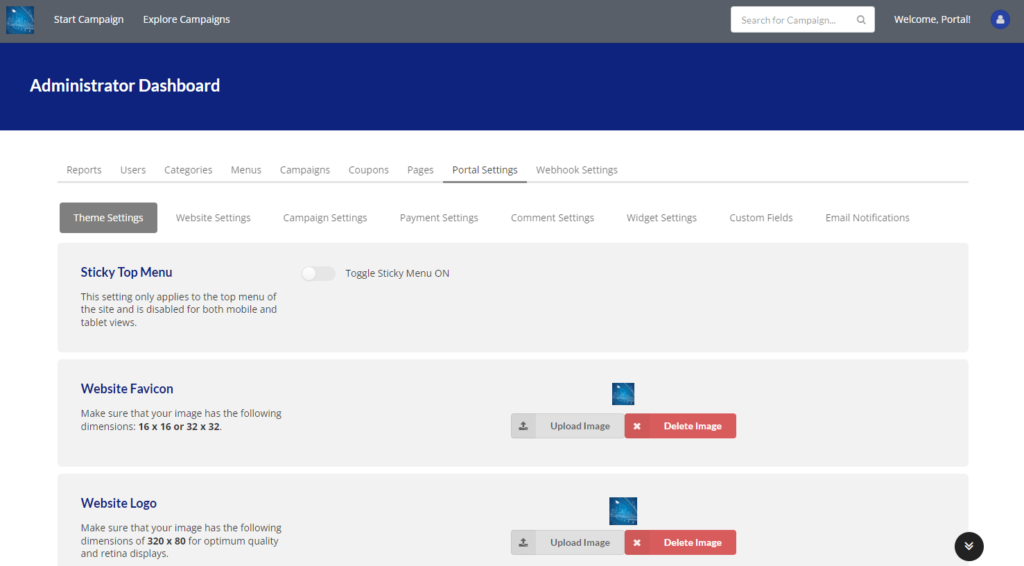
Portal Settings
Portal Settings is the last tab in the Administrator Dashboard. We will cover Portal Settings in the separate blog post: Portal Admin – Portal Settings Tutorial.
Website Administration Panel
Below we will show how to access Administration Web Panel for your newly deployed website, in a few quick and easy steps.
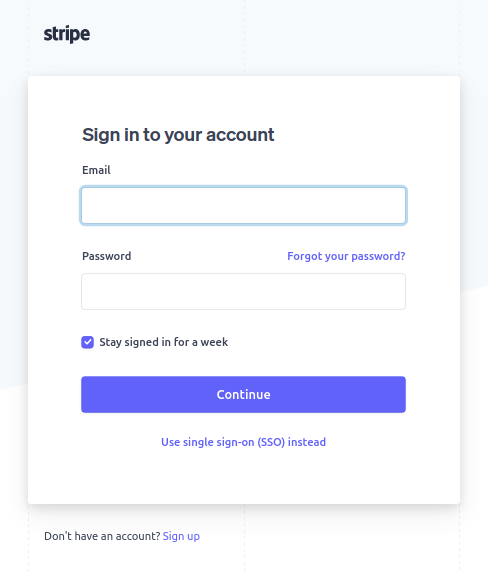
Step 1. Please use the administrator credentials and URL as per provided wiki link on nexus.thrinacia.com to log into your website as depicted in a screenshot below.
NOTE: If you don’t have the administrator credentials (username/password) and the login URL for your website then please contact support@litetuition.com and come back to this tutorial when done.

Step 2. Once you have successfully logged into the website please click onto the person icon in the top right hand corner. The menu will open called “My Dashboards” with menu link called “Administration”. Please click on the “Administration” link as depicted in the screenshot below.
Step 3. You will now see the dashboard interface as depicted in the screenshot below.