administration dashboard

Testing Pre-authorization and Capturing Funds as Portal Administrator

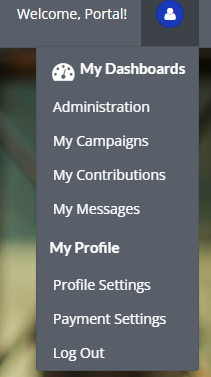
In order for this test to work, you must have an approved campaign with contributions/pledges.

STEP 1. Log in as the Portal Admin. Go to your ‘Administrator Dashboard’ and under the ‘Campaigns’ tab, select the campaign you want to test.

Checkmark the campaigns you want to edit with the check-boxes on the left of each campaign.

STEP 2. Click on the ‘Actions’ button at the top left to apply to the checked Campaigns. Click on ‘Test Post Processing’

  • Approve Campaign: Approve campaigns which are “waiting for approval”.
  • Disprove Campaign: Reject a campaign or undo campaign approval.
  • Test Post Processing: End a campaign, setting end date to -7 days. This is only used to test the Stripe Post Processing Script. Click this to test pre-authorization. (Please note: In LIVE mode, there is a 5 minute delay for the contributions to be processed for testing Post Processing. If there are transfers which are declined, you need to set the campaign status to “Accepted for capture” manually as the portal admin to capture the funds.)
  • End Campaigns: End a campaign by changing the campaign end date to current time ( will need to wait a couple of minutes to update ).
  • Delete Campaigns: Delete a campaign.
  • Feature Campaign: Feature a campaign on the front page.
  • Un-feature Campaigns: Remove a campaign from the Features List.
  • Hide Campaigns: Hide the campaign from  /explore and front page. To access the campaign, you will need a direct link.
  • Un-hide Campaigns: Show the campaign again.

STEP 3. The system will automatically process the ended campaign and you will receive email notifications for each processing stage of the campaign.

STEP 4. You will now see your transactions on your Stripe dashboard.

Tagged

Email Notifications and Templates

In this short tutorial, we will show how to use and adjust each email template found in the Email Notifications tab in the Administrator Dashboard.

Toggling the Email Notifications

You can toggle (using the toggle button on the right) which email notifications you want to allow. The next step will show you how to configure the message themselves.

Customizing the Email Templates

Using the built-in text editor, you can edit the content of the emails. On the top right, you’ll see the token system we’ve implemented which allows you grab details exclusive to that campaign. Just choose a value from the dropdown, and click “Insert Token”. This will insert that token in the position of your text cursor.

Check the screenshot below for the highlighted example.

To make sure this is all working correctly please make sure to switch the froala editor to the code view (using the code view button on the toolbar) and check that your token is wrapped with <tmplvar>. Wrapping it with <tmplvar> interpolates the tokens and without this there will be issues.

Please note: You can only insert <tmplvar> through the code view.

Check screenshot below for an example.

Email Notification Table

Here is a table showing when each email notification is sent (i.e. under what conditions).

Email TitleSent Condition
Campaign ApprovedWhen a campaign is approved manually
Campaign Auto ApprovedWhen a campaign is created and automatically approved ( toggle in the settings )
Campaign Cancelled By Administrator or ManagerWhen a campaign is cancelled
Campaign Currently Being FinalizedWhen a campaign is the Finalized step during Post Processing
Campaign Not ApprovedWhen a campaign is not approved
Campaign Sent For ReviewWhen a campaign is sent for review
Campaign Review SubmittedWhen a campaign is sent for review
Change Email RequestWhen an email change request is sent
Contact Form SubmitWhen the contact form has been submitted
Forgot PasswordWhen a Forgot Password request has been sent
Inline Account RegistrationWhen a new account has been registered
Campaign Pledge Direct ProcessingWhen a pledge is made to a Direct Processing campaign
Campaign Pledge Post ProcessingWhen a pledge is made to a Post Processing campaign
Pledge Processor – Campaign Capture CompletedWhen a campaign Capture process is completed
Pledge Processor – Campaign Capture StartedWhen a campaign Capture process is started
Pledge Processor – Campaign FinishedWhen a campaign has ended
Pledge Processor – Campaign Pre AuthorizationWhen a campaign has passed or failed the Pre-Authorization process
Account ReconfirmationWhen a re-confirmation email is sent to new accounts
Account RegistrationWhen a confirmation email is sent to new accounts
Campaign Stream UpdateWhen a campaign Stream is updated
Tagged

Portal Admin – Administration Dashboard Tutorial

This blog post will teach you about some the functionality and provide an overview of how to use the Administrator Dashboard.

  • Once you have logged in as Portal Admin you can click on the icon in the top right corner.  This will open up the My Dashboard menu, click on Administration.
  • Once you have entered the Administrator Dashboard you will see several tabs near the top of the page, the first being Reports.

 Users

In the Users tab you can view all of the users that have accounts on your site.

  • You can filter through users by clicking on and selecting an option from either of the two drop down menus or search by name or email on the far right.
  • To add a user click on the Actions button and then select Add User from the drop down menu.  An Add User form will pop up, fill it out with the new user’s information.
  • To delete or approve a user you can click on the user’s check box on the left and then click on the Actions button. Select Delete Users or Approve Users from the drop down menu.
  • Click on the Edit button on the far right to update a particular user’s information.
  • Click on the Export to CSV button at the bottom of the page to download a spreadsheet list of all users.

Categories

In the Categories tab you can view all of the categories on your site.

  • To add a category click on the Add New Category button and fill out the form that pops up.
  • To delete a category click in the check box beside the categories that you would like to delete, and then click the Delete Selected Categories button.
  • Click on the Edit button on the far right to update the name and description of any particular category.
  • You can change the order in which categories appear by clicking and holding down on a particular category row, drag and drop it into the appropriate place in the list.

Campaigns

In the Campaigns tab you can view all of the campaigns that are on your site.

  • You can filter through campaigns by clicking on and selecting an option from any of the three drop down menus or search by the campaign name on the far right.
  • The Actions button has a few options for updating any particular campaign, (Approve CampaignDelete CampaignFeature Campaign, etc.).  Click on the campaign’s check box on the left and then click on the Actions button. Select one of the options from the drop down menu.
  • You can change the order in which campaigns appear by clicking and holding down on a particular campaign row, drag and drop it into the appropriate place in the list.
  • In the table under the Action column you can select Edit from the drop down. This will bring you to the Campaign Basics page. From here you can view and update the selected campaign’s Details, Rewards, Profile, Funding and Preview.  This blog post explains how to create or edit a campaign: Create a Campaign Tutorial.
  • Click on the Transactions button on the far right to view a breakdown of funding transactions for a particular campaign.  Click on the Export to CSV button at the bottom of the page to download a spreadsheet list of all transactions.

Pages

In the Pages tab you can view a list of the website pages that are on your site.

  • To add a page you can click on the Actions button and then select Add Page from the drop down menu.  An Add Page form will pop up.  Fill out the input fields and add content below.  Click the Save Page button once you are done editing.
  • To publish, un-publish or delete pages click on the user’s check box on the left and then click on the Actions button. Select Publish PagesUn-publish Pages or Delete Pages from the drop down menu.
  • Click on a link in the Path column to view the page. Click Edit on the right to update a page.

 Portal Settings

Portal Settings is the last tab in the Administrator Dashboard. We will cover Portal Settings in the separate blog post: Portal Admin – Portal Settings Tutorial.

Tagged