Stripe

How Can I Troubleshoot My Payment Configuration?

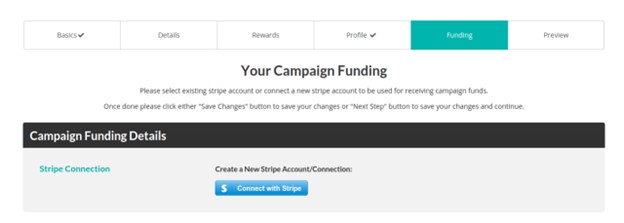
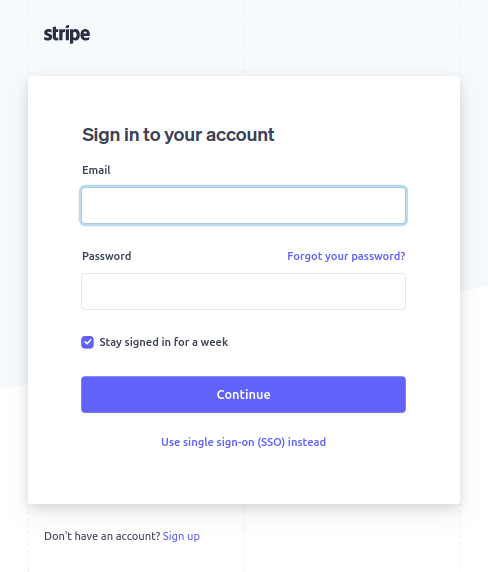
Sometimes you may run into configuration issues with payment processing.

Please note that we do our best to help you with this including online help tutorials or assistance from our engineering team that can check or verify your payment configuration to ensure everything is correct.

Have you gone over the following tutorial below on how to configure the main Stripe account for your website instance?

https://litetuition.com/tutorials/how-to-setup-and-configure-stripe-account-for-your-crowdfunding-portal/

Please make sure all the steps are followed in the above tutorial including creation of platform on Stripe.

Next, if you are planning to have project creator connect their stripe/bank account to campaign during campaign creation (like a kickstarter) for automatic distribution of funds, you will need to then follow the tutorial below.

https://litetuition.com/tutorials/creating-a-campaign-and-connecting-your-stripe-account-to-campaign/

Alternatively, you can use “Direct Transaction” feature if you will not be having project creators connecting their accounts and all money will go into portal account only as per below and you may handle distribution of funds manually.

That means you only need to do the connection once at the portal level and the funding step will be removed from campaign creation process.

https://litetuition.com/tutorials/introducing-direct-transactions/

Finally, if you are seeing customers created but not charges then your issue may reside with charge modes. Lite Tuition allows you to process payments in two charge modes.

1. Direct Charge Mode

or

2. Post Charge Mode

Defaults are for AoN type of campaign (All Or Nothing) that payments are processed in Post Charge Mode, and for KiA (Keep It All) type of campaigns that payments are processed in Direct Charge Mode.

These modes are configurable from the Administration Panel.

If you are indeed using AoN campaigns with Post Charges, then these should be tested as per tutorial below. Note that you will need to end the campaign so it can be tested (for this please refer to “Test Post Processing” option).

Direct Charges do not require this as they are processed immediately.

https://litetuition.com/tutorials/testing-pre-authorization-and-capturing-funds-as-portal-administrator/

If you are still experiencing problems with your Stripe configuration, we will need to you to create a new support ticket on support.litetuition.com and invite our team to your Stripe account temporarily (you can remove us later). You can invite dev@litetuition.com and our engineer can examine both your Stripe and your Website Configuration to ensure there are no issues.

Testing Pre-authorization and Capturing Funds as Portal Administrator

In order for this test to work, you must have an approved campaign with contributions/pledges.

STEP 1. Log in as the Portal Admin. Go to your ‘Administrator Dashboard’ and under the ‘Campaigns’ tab, select the campaign you want to test.

Checkmark the campaigns you want to edit with the check-boxes on the left of each campaign.

STEP 2. Click on the ‘Actions’ button at the top left to apply to the checked Campaigns. Click on ‘Test Post Processing’

  • Approve Campaign: Approve campaigns which are “waiting for approval”.
  • Disprove Campaign: Reject a campaign or undo campaign approval.
  • Test Post Processing: End a campaign, setting end date to -7 days. This is only used to test the Stripe Post Processing Script. Click this to test pre-authorization. (Please note: In LIVE mode, there is a 5 minute delay for the contributions to be processed for testing Post Processing. If there are transfers which are declined, you need to set the campaign status to “Accepted for capture” manually as the portal admin to capture the funds.)
  • End Campaigns: End a campaign by changing the campaign end date to current time ( will need to wait a couple of minutes to update ).
  • Delete Campaigns: Delete a campaign.
  • Feature Campaign: Feature a campaign on the front page.
  • Un-feature Campaigns: Remove a campaign from the Features List.
  • Hide Campaigns: Hide the campaign from  /explore and front page. To access the campaign, you will need a direct link.
  • Un-hide Campaigns: Show the campaign again.

STEP 3. The system will automatically process the ended campaign and you will receive email notifications for each processing stage of the campaign.

STEP 4. You will now see your transactions on your Stripe dashboard.

Tagged

Creating a Campaign and Connecting your Stripe Account To Campaign

As a project creator you are now ready to create a campaign and connect your stripe account to your CrowdFunding campaign. Here are a few short steps showing how to do this.

STEP 1. Once you have created your campaign, head to the ‘Funding’ tab and click ‘Connect with Stripe’.

STEP 2. This will redirect you to Stripe, you will need to login if you haven’t done so or fill out the form. You can skip the form if you are in ‘Development Mode’ (you must be logged in to your stripe account as well).

STEP 3. Now you can select your stripe account in the drop down, based on the account email. Live and Test connections will be labelled.

STEP 4. Fill out the rest of the information for your campaign and after all fields are filled out, you can now send it for review.

Tagged

Post Processing Workflow Explained

This post will try to explain post processing workflow in more detail and outline some differences in regard to direct processing.

Campaign Processing Workflow

The post processing workflow offers several advantages over direct processing. However, there are always cases when either post or direct processing workflows make more sense. KiA campaigns can certainly benefit from Direct Processing and AoN campaigns are better suited for Post Processing. That is why these are the sensible defaults.

Imagine the following scenario. You had AoN campaign that had 100 contributors running in direct processing mode. If project ended and did not reach its goal or reached its goal but creator decided to back out, then project creator would need to refund those 100 backers manually.

However, if post processing mode was used then creator would not need to handle the refunds manually due to how post processing and credit cards work.

In post processing workflow what happens is as follows:

  1. Campaign ends at a certain date.
  2. If the campaign is successful (AoN) or under KiA mode, it moves into the special 5 day post processing phase
  3. Backend will try then to pre-authorize all credit cards to determine success rate and put fund holds.
  4. If there is a 100% success rate, it will automatically put campaign into capture phase (that occurs at end of 5 days), if not project creator or admin has to explicitly accept the campaign for capture by following the link sent in email or by changing campaign status manually to “Accepted for Capture” in administration panel (if administration account is used)
  5. If there is less than 100% success rate for pre-authorizations, project creator will get notified and also backers will get notified so they can re-try their pledges with new credit cards
  6. At any point project creator can back out of the campaign, however backers are not allowed to back out once they contributed, only project creator can back out.
  7. On the fifth day all pre-authorizations will get automatically processed as captures if the campaign has entered capture state as per #4
  8. If the campaign is canceled, project creator backed out, etc. then all pre-authorizations will automatically fall off after 6 days, so there is no need for manual refunds to be performed.
  9. The 5-day period gives enough time to project creators to determine the fate of campaign and also allows the backers to re-submit credit card information to ensure higher success rates
  10. Post processing mode is always a recommended mode for AoN campaigns.

Note that 5-day time period is a default time period and can be adjust to lower value if desired in the administration panel for the website.

The post processing workflow can always be tested immediately without waiting for 5-days.

Campaign Processing States

Once the campaign leaves the Approved / Running state ( campaign run time is finished ), the campaign is then going to enter final states as described below.

StateDescriptionOutcomes
Finished – Processing Pre AuthorizationThis is when backend pledge processor will try to pre-authorize the pledgesCampaign will either be Accepted for Capture or Declined depending on 100% success of Pre-Authorization, Campaign Manager is notified
Finished – Accepted For Processing CaptureThis is when backend pledge processor has pre-authorized the cards with 100% success ratePledge Processor will begin capture on all cards in 5 day period, Campaign Manager is notified and has option to cancel during this time
Finished – Declined For Processing CaptureThis is when backend pledge processor has not been able to pre-authorize all cards with 100% success rateCampaign Manager is notified and has option to cancel during this time or proceed with collection of whatever pledges are available in 5 day period
Finished – Processing CaptureThis state is entered when pledges are ready to be captured, normally it occurs after 5 days of campaign being accepted for captureCampaign Manager is notified that capture has started and status of campaign has changed accordingly
Finished – Capture Processing CompleteThis is the final state of pledge processing which indicates that pledge capture phase is finishedCampaign Manager is notified that capture has finished and status of the campaign has changed accordingly

How to Setup and Configure Stripe account for your Crowdfunding portal

In this tutorial, we will cover how to set up your stripe account and connect it to your crowdfunding site.

Step 1: Create a Stripe account

Stripe Signup Page

Step 2: After logging in, access your API Keys

Go to the Stripe Dashboard and click on the Developers option at the top right corner of the page.

Stripe API Keys

You will see a set of keys. To switch between TEST  and LIVE keys, toggle the “Viewing test data” on the side. TEST keys are used for testing (Test Secret Key and Test Publishable Key) and the other for the actual live transactions (Live Secret Key and Live Publishable Key).

Note: If you want to use live data you have to make sure that you have activated your account. You will need to also fill out a form to connect your bank account.

Step 3: Copy and paste your API keys to your crowdfunding platform. It is located under Administrator Dashboard > Portal Settings > Payment Settings tab > Secret/Publishable key fields.

Step 4: Go back to your Stripe dashboard, add a redirect URI and copy/paste your Client ID to your platform.

Click on Connect Settings

Click on the gear icon in the top right corner of the screen. In the Stripe admin dashboard, then scroll down and click on the connect settings. Make sure you turn the OAuth for Standard accounts setting ON.

Copy the Redirect URL that is shown in the payment settings page:

Redirect URL Stripe Dashboard

Also, don’t forget to copy your Client ID and paste it back to your crowdfunding platform’s payment settings as shown on the screenshot below.

Once these steps are done you are all set and ready to go!

Tagged