Stripe

Creating a Campaign and Connecting your Stripe Account To Campaign

As a project creator you are now ready to create a campaign and connect your stripe account to your CrowdFunding campaign. Here are a few short steps showing how to do this.

STEP 1. Once you have created your campaign, head to the ‘Funding’ tab and click ‘Connect with Stripe’.

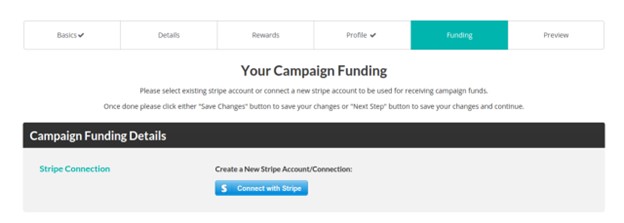
STEP 2. This will redirect you to Stripe, you will need to login if you haven’t done so or fill out the form. You can skip the form if you are in ‘Development Mode’ (you must be logged in to your stripe account as well).

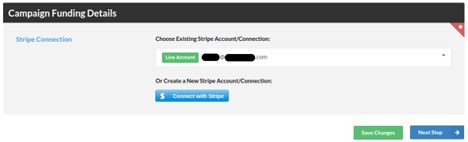
STEP 3. Now you can select your stripe account in the drop down, based on the account email. Live and Test connections will be labelled.

STEP 4. Fill out the rest of the information for your campaign and after all fields are filled out, you can now send it for review.

Related Post

Lite Tuition Platform Quick Setup

Would you like to quickly setup your Lite Tuition white label platform? If so, this article is going to explain how to add the settings to start running your own Crowdfunding website. If you intend to run a Crowdfunding platform for rewards and donations based Crowdfunding campaigns, you can use this article to quickly get set […]

Read more
Testing Pre-authorization and Capturing Funds as Portal Administrator

In order for this test to work, you must have an approved campaign with contributions/pledges. STEP 1. Log in as the Portal Admin. Go to your ‘Administrator Dashboard’ and under the ‘Campaigns’ tab, select the campaign you want to test. Checkmark the campaigns you want to edit with the check-boxes on the left of each […]

Read more
Introducing Direct Transactions

“Direct Transactions” is a feature which allows for direct stripe connect transactions that portal admin can toggle. Basically, this mode allows all the funds from campaigns to go to a single stripe account which is selected by the admin. Admin can then distribute the funds to campaign creators or managers manually. By enabling this feature, […]

Read more