Processing Webhooks

Webhooks is a feature that allows you to set callback URL’s (webhooks) for various background processing events.
For example, let’s assume you are post processing all your campaigns and you wanted to be notified of events that transpire when campaign and it’s transactions are being processed so that you could do some other post processing using such events within your own system.
Well you could accomplish that by first navigating to Administration Panel -> Webhooks -> Background Processor.
There (as depicted in screenshot below) you will see several URL’s that can be set for each type of events you want to listen for. Once set the processor will send the URL notifications automatically when there is new data available to process.

Event notification endpoints for Background Processor
- Process Ending Campaigns ( Endpoint URL for campaigns in ended state )
- Process Pre-Auth Campaigns ( Endpoint URL for campaigns in pre-auth state )
- Process Accepted For Capture Campaigns ( Endpoint URL for campaigns in accepted for capture state )
- Process Capture Campaigns ( Endpoint URL for campaigns in capture state )
- Process Cancelled Campaigns ( Endpoint URL for campaigns in cancelled state )
As campaigns transition through these event states appropriate callback URL’s will be invoked as set in the Administration Panel -> Webhooks -> Background Processor and your code can then execute to do something else.
The Callback URL will get JSON posted data with following main array keys.
“data” => Main Result Data
“error” => Any Processing Errors
“action” => Endpoint Action
“fingerprint” => Fingerprint or signature for the request so it can be verified
If you need to verify that requests are originating from your instance and not somewhere else then you can use fingerprint field. Simply take the fingerprint field which will come in the JSON callback request and send GET request

You can also update fingerprint by sending PUT request to the same endpoint with fingerprint and used parameter set to true or false. This marks fingerprint as used. Note that signed fingerprints auto expire after 3 weeks from when they are created. Once expired they are removed from system.
Endpoint event actions are outlined further as per below.
| Action Name | Action Description | Endpoint |
| process_ending_direct | Campaign finalized as direct charge detected | #1 |
| process_ending_preauth | Campaign updated to pre-auth state, post processing detected | #1 |
| process_preauth_campaign | State change on campaign | #2 |
| process_preauth_transaction | Pre-auth performed on transaction | #2 |
| process_accepted_capture_campaign | State change on campaign | #3 |
| process_capture_campaign | State change on campaign | #4 |
| process_capture_transaction | Capture performed on transaction | #4 |
| process_cancelled_campaign | State change on campaign | #5 |
Event notification endpoints for Campaign
- Pledge Operations ( Endpoint URL for campaign pledges )
| Action Name | Action Description | Endpoint |
| pledge_create | Create campaign pledge | #1 |
| pledge_update | Update campaign pledge | #1 |
| pledge_delete | Delete campaign pledge | #1 |
NOTE: All event actions will result in either sucess or failure as indicated by the “error” structure returned. Also consider using HTTPS callback URL’s for increased security as information will be transmitted in encrypted form.
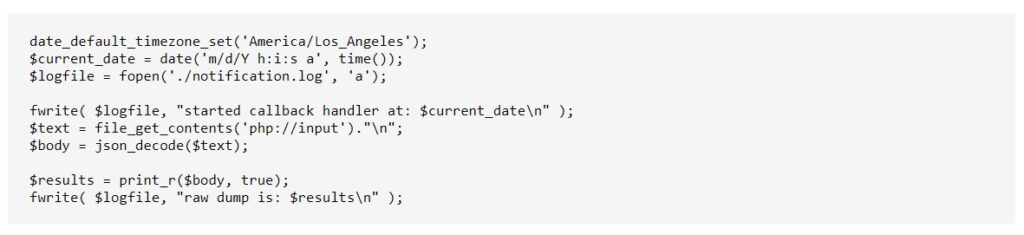
Below is example PHP code which can be used to listen for events on your side. You can however write such code in pretty much any modern language such as Python or Ruby.
Email Notifications and Templates
In this short tutorial, we will show how to use and adjust each email template found in the Email Notifications tab in the Administrator Dashboard.
Toggling the Email Notifications

You can toggle (using the toggle button on the right) which email notifications you want to allow. The next step will show you how to configure the message themselves.
Customizing the Email Templates
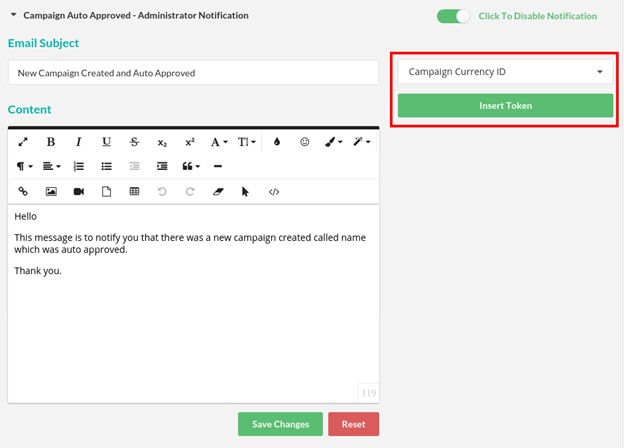
Using the built-in text editor, you can edit the content of the emails. On the top right, you’ll see the token system we’ve implemented which allows you grab details exclusive to that campaign. Just choose a value from the dropdown, and click “Insert Token”. This will insert that token in the position of your text cursor.
Check the screenshot below for the highlighted example.

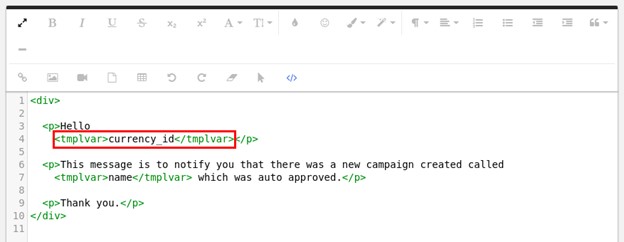
To make sure this is all working correctly please make sure to switch the froala editor to the code view (using the code view button on the toolbar) and check that your token is wrapped with <tmplvar>. Wrapping it with <tmplvar> interpolates the tokens and without this there will be issues.
Please note: You can only insert <tmplvar> through the code view.
Check screenshot below for an example.
Email Notification Table
Here is a table showing when each email notification is sent (i.e. under what conditions).
| Email Title | Sent Condition |
| Campaign Approved | When a campaign is approved manually |
| Campaign Auto Approved | When a campaign is created and automatically approved ( toggle in the settings ) |
| Campaign Cancelled By Administrator or Manager | When a campaign is cancelled |
| Campaign Currently Being Finalized | When a campaign is the Finalized step during Post Processing |
| Campaign Not Approved | When a campaign is not approved |
| Campaign Sent For Review | When a campaign is sent for review |
| Campaign Review Submitted | When a campaign is sent for review |
| Change Email Request | When an email change request is sent |
| Contact Form Submit | When the contact form has been submitted |
| Forgot Password | When a Forgot Password request has been sent |
| Inline Account Registration | When a new account has been registered |
| Campaign Pledge Direct Processing | When a pledge is made to a Direct Processing campaign |
| Campaign Pledge Post Processing | When a pledge is made to a Post Processing campaign |
| Pledge Processor – Campaign Capture Completed | When a campaign Capture process is completed |
| Pledge Processor – Campaign Capture Started | When a campaign Capture process is started |
| Pledge Processor – Campaign Finished | When a campaign has ended |
| Pledge Processor – Campaign Pre Authorization | When a campaign has passed or failed the Pre-Authorization process |
| Account Reconfirmation | When a re-confirmation email is sent to new accounts |
| Account Registration | When a confirmation email is sent to new accounts |
| Campaign Stream Update | When a campaign Stream is updated |
Campaign Revisions Toggle
The campaign revisions toggle is designed to allow admins and campaign managers to update the campaign while it has already started. The toggle, however, can cause issues with the campaign among other features on the website due to its complexity.
We warn anyone who decides to use this toggle and would recommend that if you run into any minor issues on the platform, to turn this toggle OFF and see if it will fix it.
Enabling alternative layouts for your crowdfunding site

Please note that when you are enabling some of these special toggles/configurations for alternative layouts in the admin dashboard that they will alter the default layout to a custom layout.
Sometimes you may think it is broken or something doesn’t look right but this is a default template to start with which will require further CSS customization to make it look the way you want it.
If you do not want this, then make sure not to use some of these special toggles and make sure they are turned off.
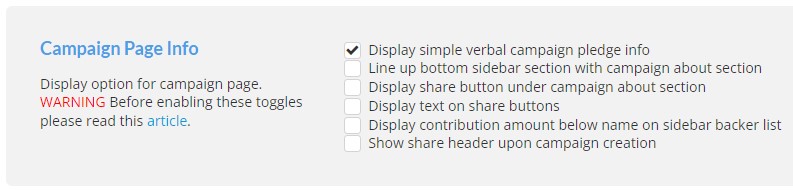
If you look at the screenshot below, the toggle called “Display simple verbal campaign pledge info” will toggle an alternative layout
An example below is provided when you start using the alternative layouts.
Toggle Disabled (Default layout with default styles):
Toggle Enabled (Alternative layout without custom style):
Now that you’ve seen what these toggles will do, you may require additional custom css to be added on your site to suit your theme.
How to Enable the Advanced CrowdFunding Widget for Your Website
In this tutorial, we will show you how to enable the Advanced CrowdFunding Widget for your website portal so that you can offer it to the users of your website.
Advanced CrowdFunding Widget allows the website campaign creators to copy and paste small HTML code snippet anywhere on their website and host the campaign directly on that website.
First navigate to your CrowdFunding Website Administration Panel and click on Portal Settings. Then follow the steps below.
Step 1. Click on Website Settings: Enable the Widget
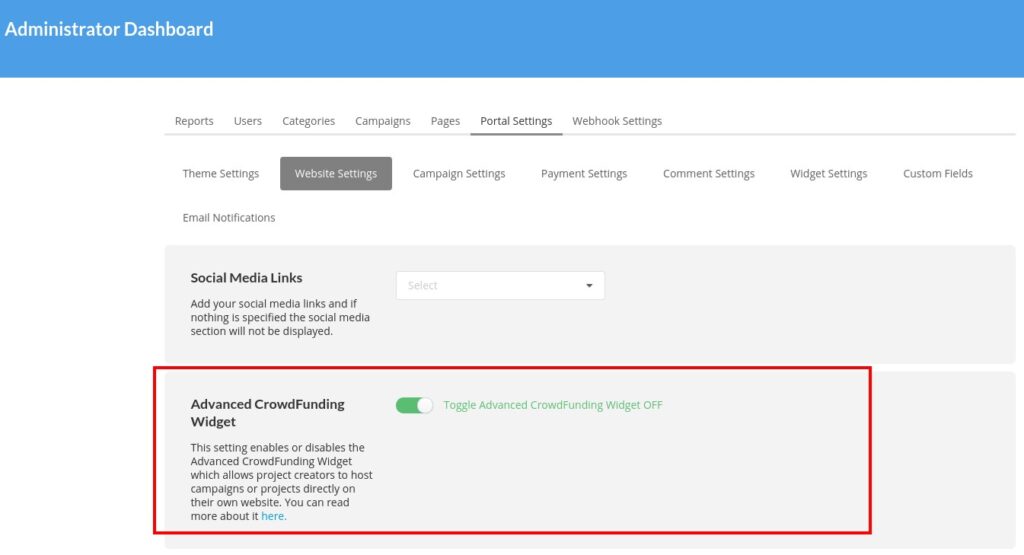
IMPORTANT: Make sure to have this setting toggled ON
Step 2. Campaign Creation: Widget Step will be added
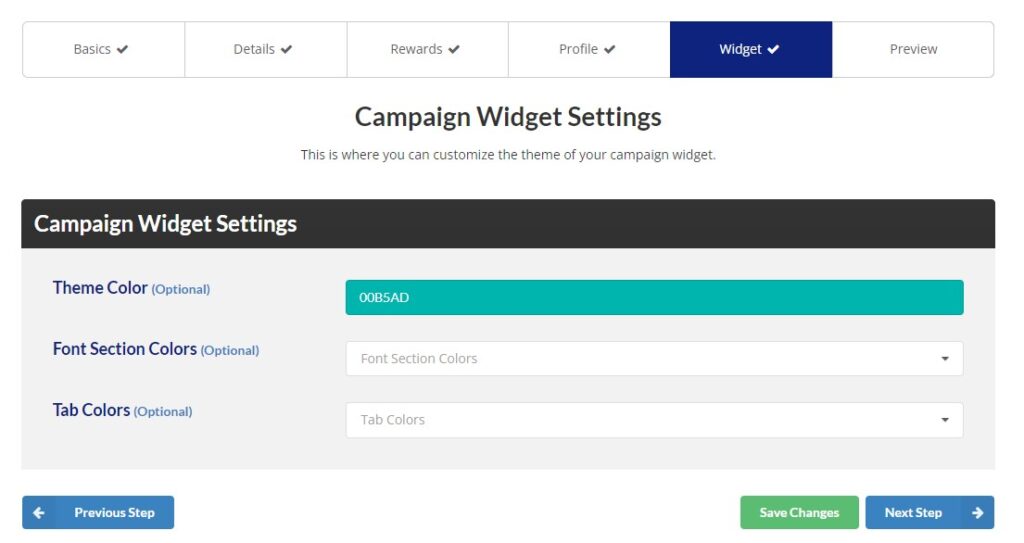
Note the Widget tab that is added. Here you can adjust the general theme and font colors for the widget.
Step 3. Campaign Preview
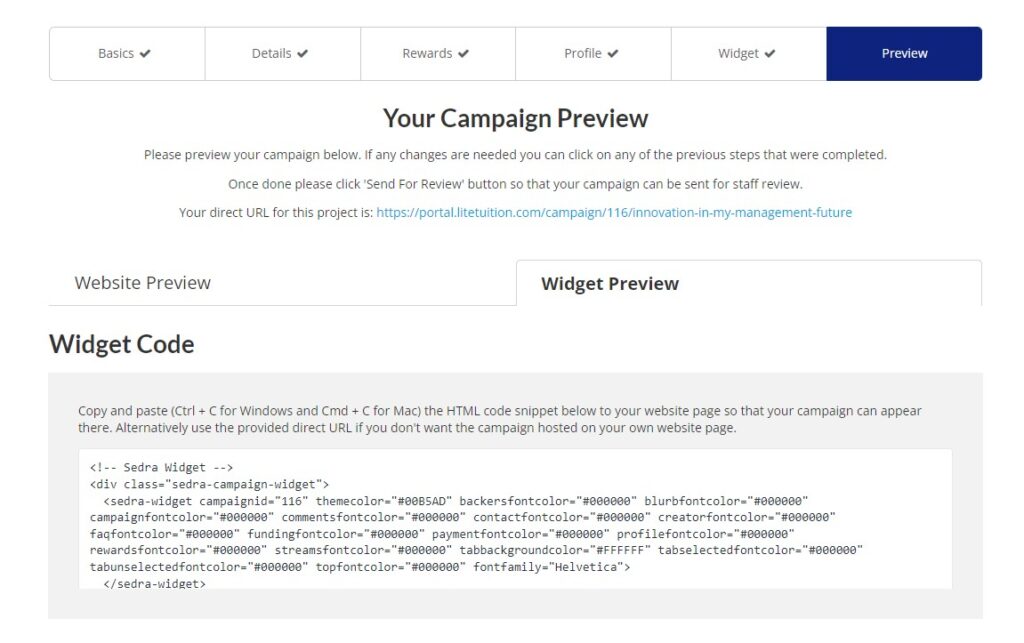
A new tab for the previews will be added. You can switch between the normal campaign preview ( Website Preview ) and the new widget preview ( Widget Preview ).
To embed the widget on any website, just follow the instructions and copy/paste the small code snippet to your target website where you want the widget to show.
Using Okta for Social Sign On

Do you want your users to sign into your Lite Tuition platform via an identity provider that they may already be using such as Facebook, LinkedIn, Google, Apple, Microsoft, and Okta? This tutorial is going to cover how to set up Okta the SSO (Social Sign On) feature on the Lite Tuition white label platform.
Okta is the identity provider service that you will need to use in order to add the identity providers as mentioned earlier. This will be mandatory to sign up for and set up if you would like to be using the other providers to sign into the platform.
Step 1. Sign up for Okta
Go to developer.okta.com to sign up for a new account. Be sure NOT to sign up for an okta.com account as the pricing for these accounts is different and will also provide a different dashboard user interface.

Step 2. Enable the Okta feature
Log into your Lite Tuition platform as a portal admin and do the following:
Go to the admin dashboard –> Portal Settings –> Website Settings –> Social Login –> Enable Social Login.
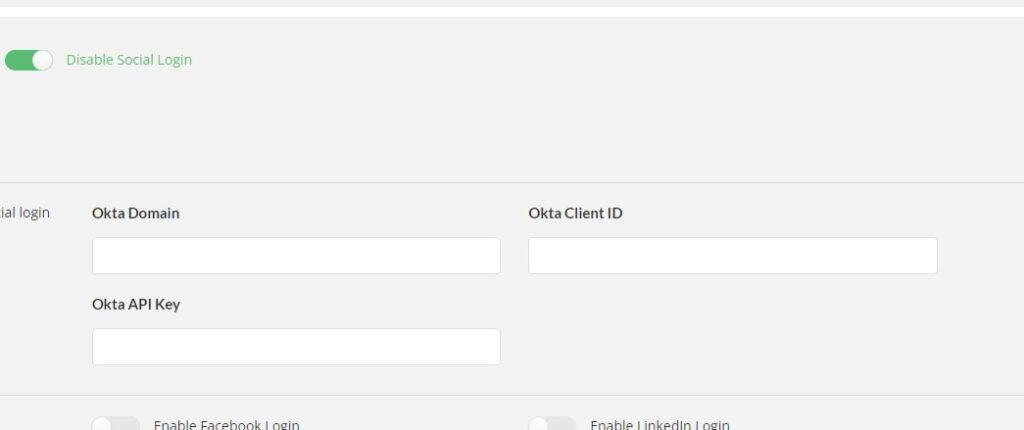
As you can see, you will need to paste information into the fields as shown above in order to connect with Okta and enable this feature.
Step 3. Create a new application on Okta
Once you have created the developer Okta account, you will need to create a new application on Okta. Simply log into Okta and go to the admin dashboard. Next, click on Applications.
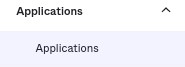
Applications option in the left menu
You can create the new application by clicking on the blue Add Application button.

Add application
You will be directed to another page. On this page, click on the blue Create New App button in order to create the new app.

Create New App
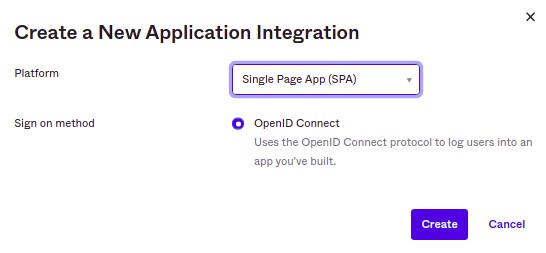
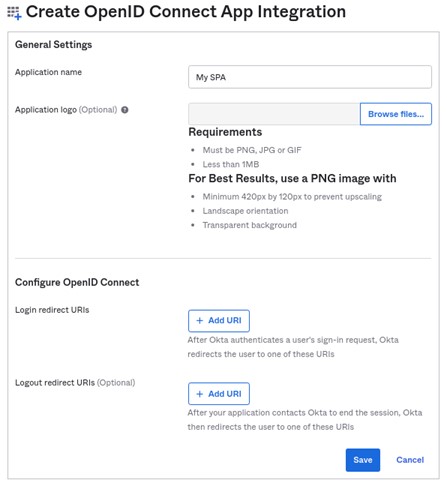
You will then need to choose the type of app that you want to create. Choose Single Page App (SPA).
Now that you have created the new app, you will need to add the correct Login/Logout URI’s. This will be your Lite Tuition Platform URL, for example, if your platform is hosted on https://platform.litetuition.com then you should add this URL.
Step 4. Add the Client ID and Okta Domain into your Lite Tuition Platform
Now that you have created a new SPA, paste both the Client ID and the Okta domain into the Lite Tuition Platform social login settings.
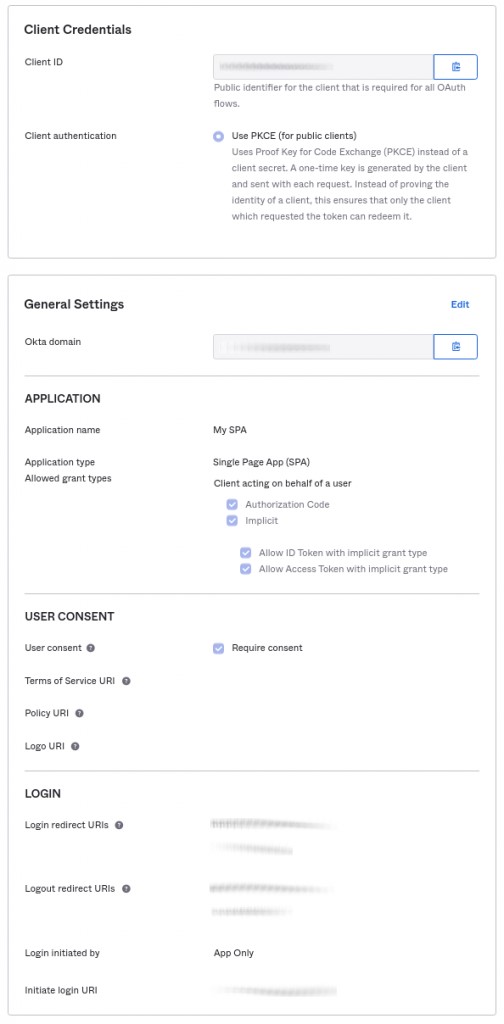
Application UI
First, you will need to copy the Client ID and paste it into the Atlas dashboard.
Once you have done that, you can then copy the Okta domain and paste it into the Atlas dashboard.
PLEASE NOTE that you will need to include https:// when pasting the Okta domain into the Lite Tuition dashboard.
Step 5. Create and paste the new API token
Now that you have the client ID and Okta domain added into the Lite Tuition dashboard, you will need to add the API token from Okta. To do this, go back to the Okta admin dashboard.
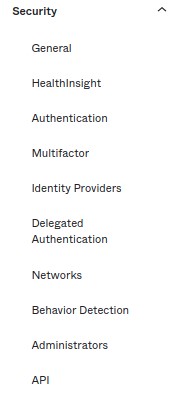
Click on the Security item in the left menu, then click on the API option.
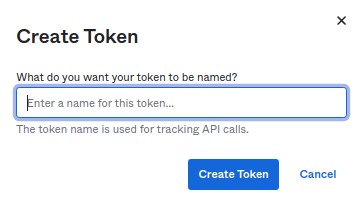
Click on the Tokens tab, then click on Create Token button.
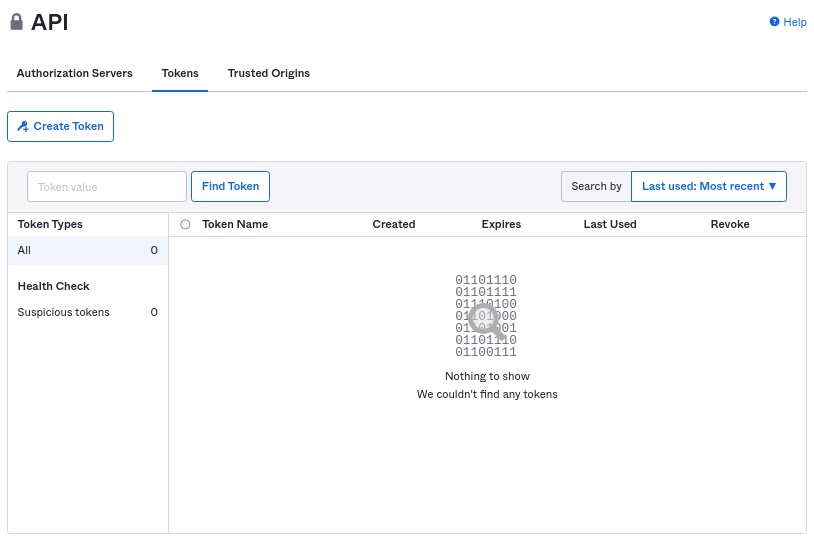
Add a name for the new token.
You will be presented with the one-time API Token. Copy this and paste it into the Lite Tuition dashboard.
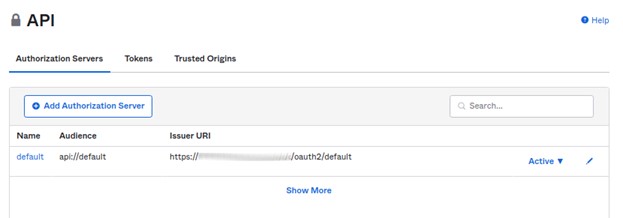
PLEASE NOTE if you have a custom login URL for Okta, you will need to make sure that this custom login URL is reflected in the issuer area when going to Okta API –> Security –> API –> edit the default API (click on blue pencil icon) –> Issuer URL. If you have not created a custom URL for Okta login then this does not apply to you.
Step 6. Adding Claims
Since you are already on the API page, click on the Authorization Servers tab, then click on the edit button (blue pencil icon).
Next, click on the Claims tab, then Add Claim.
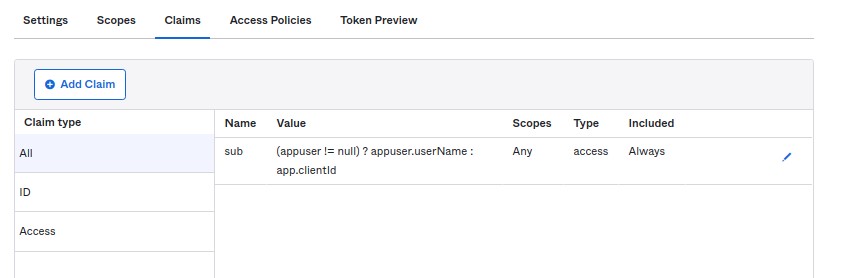
You will need to add 2 claims. The first name and the last name. Please see the below screenshots for the correct configuration.
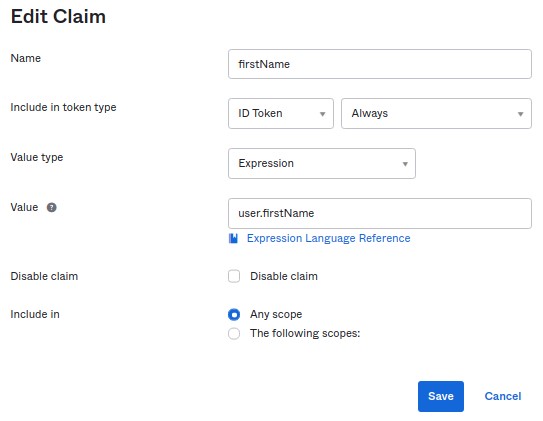
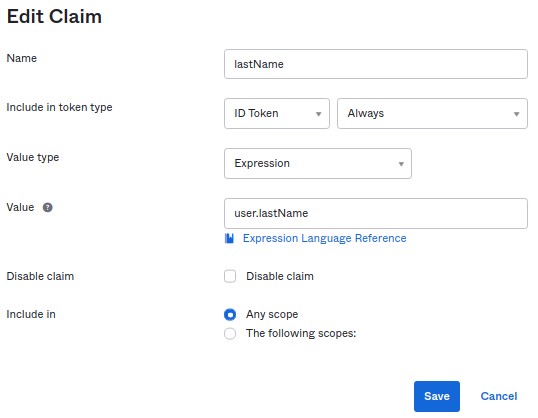
Remember to save the claims.
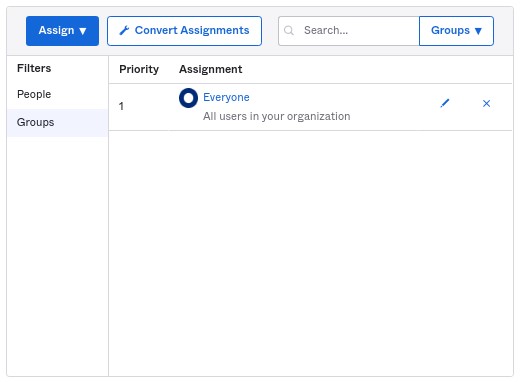
Step 7. Adding groups
You will need to add the users that you would like Okta to be using for the app. In this example, we will be using everyone. Go back to the SPA app by clicking on the applications item, the left menu.
Then click on the assignments tab. Here you can assign users to the app.
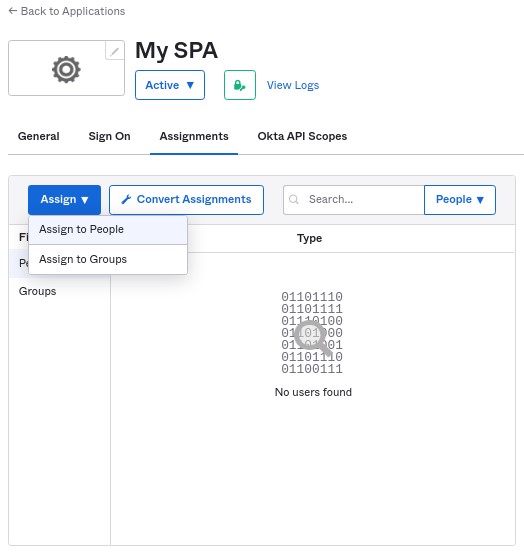
Choose Assign to Groups, then click on the Assign button to assign everyone.

That’s it! You have now connected Okta to your platform.
Now that you have followed the above steps and have successfully connected Okta to your platform, you can try adding one of the following identity providers:
The importance of a pre-launch campaign

Are you considering running a Lite Tuition campaign? If so, you will need to know the best practices that separate the campaigns that get 5 – 10 supporters from the ones that surpass their funding goal.
One of the biggest advantages is conducting a pre-launch campaign. This may be one of the biggest factors that play into your Lite Tuition campaign. Many people decide to go out on a limb and simply post their Lite Tuition campaign on a platform, and expect the platform to generate all of the support for them. This does not work! Most of the support that you receive are from your own marketing.
The process
Now that you understand, you will not receive support simply by adding your campaign to the platform of your choice. Instead, you want to generate all of your own supporters and let the platform give you additional supporters in the process. Where do you find potential supporters? This age old question is the key to a successful Lite Tuition campaign. You need to conduct research into your potential supporter and target those who are most likely to support your campaign.
Next, is when you will decide to market to the potential supporter. This starts before you actually launch your Lite Tuition campaign. That is why it is called a pre-launch campaign. You need to share your story to the ones that will potentially support your campaign before it launches. Many companies decide to host a contest online, or another form of marketing campaign. However you decide to market the campaign, you need to keep in mind the end goal. Furthermore, the end goal is to gain access to a potential supporter, this can be in the form of gathering email addresses, or likes on social media, etc. You need to find the identities of those who may be interested in supporting your campaign.
Once you gain that access to your target market, you need to keep their interest. So if you have created a social media page, or gathered email addresses, you need to send them periodic updates about the launch of your Lite Tuition campaign.
Advantages of the pre-launch campaign
The pre-launch campaign will be your biggest asset. The whole idea is to generate the initial supporters for your Lite Tuition campaign. Keeping this in mind, you will also have to utilize your existing social circle including friends and family that may want to help with the campaign. These first supporters will be the backbone of your campaign, as it will reassure others that your campaign is actually legitimate!
People are more apt to support something that other people have supported to. Would you support a campaign that has only 2 supporters? Probably not. If you see that 30 others have contributed their money to a campaign, you would likely think that it this may actually be something of interest. This is the entire focus of the pre-launch campaign. It will make others want to support. This is a HUGE consideration for people when they are giving their money to a complete stranger.
Another major asset that the pre-launch campaign will provide, is getting your campaign noticed on the Lite Tuition platform. If you create a campaign and you receive a large percent of your fundraising goal within the first week, you get featured on the site, and this is what separates the good campaigns from the great campaigns. If you are featured on the front page of Lite Tuition or any other major social media platform, you can guarantee that all eyes are on your campaign. This is how campaigns surpass their funding goals. Being featured on the homepage is a major advantage, as other media sites may write articles about your campaign, giving it more coverage on the net.
How to start
After reading this article, you need to make the first step and define your potential supporter. This means you need to find all of the similar successful fundraising campaigns to yours and deploy similar marketing campaigns. As simple as this process sounds, you may be in the research phase for several months before you decide to launch your pre-launch campaign. The most important step in the whole process is your research. The rest is straightforward. In a nutshell, you can begin your pre-launch campaign and deploy your specific marketing strategy. Once you have launched, your supporters will be ready to contribute, and start your campaign off on the right foot.
Balancing work and school can be a difficult task. It requires skillful time management and organization, as well as the ability to effectively set priorities. It can be hard to stay on top of things, but with the right strategies, any student can achieve a healthy balance. In this blog post, we’ll go over 5 tips for effectively balancing work and school.
Make a Weekly To-Do List
Starting off with a to-do list each week can help you plan out your tasks and keep yourself organized and on track. Make sure to include school work, work tasks, and personal errands on your list so you can keep track of everything that needs to be completed.
Prioritize Your Work
Once you have a to-do list, you can start to prioritize your tasks. Decide which tasks need to be done first, and which ones can wait. This will help you to stay on top of deadlines and ensure that everything gets done.
Break Large Tasks into Their Smaller Components
One way to tackle large tasks is to break them down into smaller, more manageable pieces. This will make completing the task seem less daunting and it will be easier to stay on track.
Set Goals and Deadlines for Projects
Setting goals and deadlines for projects will help you stay on track and motivate you to finish tasks on time. Remember to be realistic about the goals you set and to give yourself plenty of time to complete tasks.
Honestly Assess How You are Spending Your Time During the Day
One of the most important things you can do is to honestly assess the amount of time you waste. If you find that you are wasting too much time, you can start to make changes in order to be more productive.
- « Previous
- 1
- 2